Sorry. This post was not available in English.
คลิกที่ เพื่ออ่านบทความเป็นภาษาไทย
Showing posts with label Computer. Show all posts
Showing posts with label Computer. Show all posts
Friday, April 23, 2010
Monday, November 2, 2009
If you lost your driver CD or Unknown Device
If you lost your driver CD, and cannot remember its model name.
You can get VID,PID,VEN, and DEV, then find them in any search engines.
[See all photos]
You can get VID,PID,VEN, and DEV, then find them in any search engines.


[See all photos]
Saturday, July 18, 2009
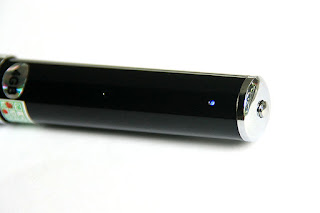
Pen Video Recorder
Yesterday my mom got her new USB "Pen" drive.
It's Pen Video Recorder with 4GB memory, 1300 BHT.


[See all photos]
It's Pen Video Recorder with 4GB memory, 1300 BHT.


[See all photos]
Sunday, June 28, 2009
Embed Subtitle into Output VDO with AviSynth
If you want to embed *.srt subtitle into output VDO by using AviSynth:
1. Download VSFilter from http://www.animereactor.dk/aegisub/
2. Extract vsfilter.dll to folder C:\Program Files\AviSynth 2.58\plugins\
3. Add these commands into *.avs file:
If audio and video are not sync'ed together, use these commands to split them, and then adjust audio delay.
1. Download VSFilter from http://www.animereactor.dk/aegisub/
2. Extract vsfilter.dll to folder C:\Program Files\AviSynth 2.58\plugins\
3. Add these commands into *.avs file:
| LoadPlugin("C:\Program Files\AviSynth 2.58\plugins\VSFilter.dll") TextSub("filename.srt") |
If audio and video are not sync'ed together, use these commands to split them, and then adjust audio delay.
| V = DirectShowSource("video.mp4",fps=25.0,convertfps=true) A = DirectShowSource("audio.aac", video=false) AudioDub(V, A) DelayAudio(-0.500) |
Sunday, January 11, 2009
Delete unused COM ports
1. Click Start -> Run -> type cmd
2. Type set devmgr_show_nonpresent_devices=1 then press Enter
3. Type devmgmt.msc then press Enter
4. Click View -> Show hidden devices
This will display devices that are not connected to your computer.
You can right-click, then select Uninstall to remove them.
Credit: http://www.mp3car.com/vbulletin/software-software-development/110742-delete-unused-com-ports-say-inuse.html
Friday, January 9, 2009
Modify Windows Vista to obtain IP address automatically
| To resolve this issue, disable the DHCP BROADCAST flag in Windows Vista. To do this, follow these steps: 1. Click Start, type regedit in the Start Search box, and then click regedit in the Programs list. 2. Locate and then click the following registry subkey: HKEY_LOCAL_MACHINE\SYSTEM\CurrentControlSet\Services\Tcpip\Parameters\Interfaces\{GUID} In this registry path, click the (GUID) subkey that corresponds to the network adapter that is connected to the network. 3. On the Edit menu, point to New, and then click DWORD (32-bit) Value. 4. In the New Value #1 box, type DhcpConnEnableBcastFlagToggle, and then press ENTER. 5. Right-click DhcpConnEnableBcastFlagToggle, and then click Modify. 6. In the Value data box, type 1, and then click OK. 7. If the DhcpConnForceBroadcastFlag is 1, double-click and modify it to 0. 8. Close Registry Editor. By setting this registry key to 1, Windows Vista will first try to obtain an IP address by using the BROADCAST flag in DHCP Discover packets. If that fails, it will try to obtain an IP address without using the BROADCAST flag in DHCP Discover packets. MORE INFORMATION If you know the router or the non-Microsoft DHCP server does not support the DHCP BROADCAST flag, you can set the following registry entry as follows instead of using the DhcpConnEnableBcastFlagToggle registry key. HKEY_LOCAL_MACHINE\SYSTEM\CurrentControlSet\Services\Tcpip\Parameters\Interfaces\{GUID} Value name: DhcpConnForceBroadcastFlag Value type: REG_DWORD Value data: 0 Note A data value of 0 disables this registry entry. You can use this registry entry to prevent Windows Vista from using the DHCP BROADCAST flag. After you set this registry entry, Windows Vista never uses the DHCP BROADCAST flag. Credit http://support.microsoft.com/kb/928233 |
| How to get GUID value? 1. Click Start, type cmd, press Enter. 2. type ipconfig /all, then look for Physical Address of your adapter. 3. type getmac, then you'll get the Transport Name as GUID value. |
But if the IP address is still unable to be obtained, the only way to do is to fix IP address, Gateway, and DNS address in Windows Vista.
Friday, October 24, 2008
Mute System Volume on Shutting Down
1. Download NirCmd,then extract to C:\Program Files\NirCmd

2. Click Start -> Run, then type gpedit.msc
3. Go to Computer Configuration -> Windows Settings -> Scripts (Startup/Shutdown), then double click on Shutdown
4. Click Add button, type C:\Program Files\NirCmd\nircmd.exe into Script Name.
And type mutesysvolume 1 into Script Parameters.
Click OK and close the Group Policy window.
To unmute system volume, click on Volume at System Tray, then uncheck the Mute.
Or you can also press a Mute/Unmute function key on your laptop.

2. Click Start -> Run, then type gpedit.msc

3. Go to Computer Configuration -> Windows Settings -> Scripts (Startup/Shutdown), then double click on Shutdown

4. Click Add button, type C:\Program Files\NirCmd\nircmd.exe into Script Name.
And type mutesysvolume 1 into Script Parameters.
Click OK and close the Group Policy window.

To unmute system volume, click on Volume at System Tray, then uncheck the Mute.
Or you can also press a Mute/Unmute function key on your laptop.

Tuesday, September 30, 2008
Watch blocked YouTube video
Sorry. This post was not available in English.
คลิกที่ เพื่ออ่านบทความเป็นภาษาไทย
คลิกที่ เพื่ออ่านบทความเป็นภาษาไทย
Thursday, September 25, 2008
Modify Laptop's SD Card Reader
Last night I have modified my laptop (Dell Inspiron 710m)
- Change SD card reader
- Fix DVD drive connector
- Fix keyboard light
- Apply CPU Silicone
I decided to change SD card reader because the old one cannot read SD card larger than 2GB (so funny).
And I've found a very cheap card reader, only 180 BHT.
It can read almost every cards, except Compact Flash card.
It can also read SDHC (SD High Capacity) too.
I used to add USB hub, so I still have 2 USB ports available.
I did't dare to remove the old SD card reader chip, only SD card slot was removed.
Now I still have 1 USB port available.
Maybe I'll add a small webcam, or 12" touch panel. ;-)


[See all photos]
Add lyric into MP3 file
To add lyric into MP3 file
You can use either Windows Media Player or Mp3tag.
If you use Mp3tag,
(Mp3Tag can also add other tags into MP3 file.)
1. Drag and drop MP3 into Mp3tag window.
2. Right click -> Extended Tags
3. Click Add field button, enter UNSYNCEDLYRICS into Field.
Enter lyric into Value.
for English, type eng||bla..bla..bla...
for Thai, type tha||bla..bla..bla...
To display lyric in Winamp
1. Install WinLyrics
2. In Registration window, click on Register>>> button, then you'll see the Registration Key.
3. Use keygen.exe to generate Activation Key from Registration Key.
To display lyric in Windows Media Player
Click Play -> Lyrics, Captions, and Subtitles -> On if Available

Wednesday, September 24, 2008
WordPress Installation
After fighting with WordPress 2.6.2 for about 2 hours.
Because it displayed only blank page after pressing 'Install'.
Searching in Goooogle, and found this website
http://trac.wordpress.org/ticket/7724
Oh shit!!! It's WordPress's bug. Installation works well after bug solving.
Yeahhh!!! Now I have my own blog!
Then disabled Post Revision function, or the database will be filled up with many garbage posts.
Added this command into file wp-config.php
Then installed Wordpress PDA & iPhone 1.2.6 plug-in for access from mobile phone.
These 3 agents were also added.
And activated Akismet 2.1.8 plug-in (built-in) to block spams.
And installed Related Entries 2.04 plug-in from this website
http://www.basicstep.net/wordpress/related-posts-plugin/
But the table can't be modified to be FULLTEXT.
So I Goooogled (again). And found that the wp_posts table needs to be changed to MyISAM.
Next, Thai localization. I choose this website
http://sourceforge.net/projects/wordpressthai/
Followed the installation from this website
http://www.wordthai.com/index.php?topic=12.0
Then installed Language Switcher and 2.6 patch for multilingual support. (Only 2 languages are enought)
And added some Quick Buttons into file /wp-includes/js/quicktags.js
Added language link into file /wp-content/themes/.../single.php (insert after <?php get_header(); ?>)
And enabled some modules.
Also installed Dashboard Widget Manager 1.3.1 plug-in to manage Dashboard.
Added StyleSheet into file /wp-content/themes/.../style.css
To use static page as a front page:
http://turbochargedcms.com/2006/11/building-a-true-home-page-into-your-wordpress-blog/
Then installed StatPressCN.
Because it displayed only blank page after pressing 'Install'.
Searching in Goooogle, and found this website
http://trac.wordpress.org/ticket/7724
Oh shit!!! It's WordPress's bug. Installation works well after bug solving.
Yeahhh!!! Now I have my own blog!
Then disabled Post Revision function, or the database will be filled up with many garbage posts.
Added this command into file wp-config.php
| // Disable Post Revisions // To delete existing revisions, use this SQL query: // DELETE FROM wp_posts WHERE post_type = 'revision'; define('WP_POST_REVISIONS', false); define('AUTOSAVE_INTERVAL', 86400); |
Then installed Wordpress PDA & iPhone 1.2.6 plug-in for access from mobile phone.
These 3 agents were also added.
| PPC, WindowsCE, Mobile |
And activated Akismet 2.1.8 plug-in (built-in) to block spams.
And installed Related Entries 2.04 plug-in from this website
http://www.basicstep.net/wordpress/related-posts-plugin/
But the table can't be modified to be FULLTEXT.
So I Goooogled (again). And found that the wp_posts table needs to be changed to MyISAM.
Next, Thai localization. I choose this website
http://sourceforge.net/projects/wordpressthai/
Followed the installation from this website
http://www.wordthai.com/index.php?topic=12.0
Then installed Language Switcher and 2.6 patch for multilingual support. (Only 2 languages are enought)
And added some Quick Buttons into file /wp-includes/js/quicktags.js
Added language link into file /wp-content/themes/.../single.php (insert after <?php get_header(); ?>)
| <?php $old_url = str_replace('&langswitch_lang='.$langswitch_lang_pref, '', $_SERVER["QUERY_STRING"]); $old_url = str_replace('langswitch_lang='.$langswitch_lang_pref, '', $old_url); if (!empty($old_url)) $old_url .= '&'; print '<div align=right>Language : <a href="?'.$old_url.'langswitch_lang=th">ไทย</a> | <a href="?'.$old_url.'langswitch_lang=en">English</a> </div>'; ?> |
And enabled some modules.
Also installed Dashboard Widget Manager 1.3.1 plug-in to manage Dashboard.
Added StyleSheet into file /wp-content/themes/.../style.css
| table.code { border-style: solid; border-width: 1px; border-color: #a0d0a0; background-color: #f0f0f0; font-family: courier; text-align: left; padding: 0.1em 0.5em; } |
To use static page as a front page:
http://turbochargedcms.com/2006/11/building-a-true-home-page-into-your-wordpress-blog/
Then installed StatPressCN.
Wednesday, August 13, 2008
Mom's Netbook
Do you believe that she's 57 years old?
(-_-")
ASUS Eee PC 1000H 10" = 18900 BHT
LG Super Slim DVD = 2700 BHT
Mouse = 600 BHT


[See all photos]
(-_-")
ASUS Eee PC 1000H 10" = 18900 BHT
LG Super Slim DVD = 2700 BHT
Mouse = 600 BHT


[See all photos]
Monday, June 9, 2008
Very slow SSH logging in
If logging in to SSH is sooooo sloooooow.
From http://ubuntuforums.org/showthread.php?t=422907
- Type
- Add this line into that file, and then save, and exit
- Type
From http://ubuntuforums.org/showthread.php?t=422907
- Type
| vi /etc/ssh/sshd_config |
- Add this line into that file, and then save, and exit
| UseDNS no |
- Type
| service sshd restart |
Sunday, June 8, 2008
Auto-Block SSH Intruder on Fedora7
From เมื่อถูก Brute-Force Attack ที่ sshd
Log in as root and type:
Then DenyHosts will do its job. No need for maintenance.
You can view the blocked IP at:
Activity log file is here:
The configuration of denyhosts is here:
Log in as root and type:
| chmod 604 /var/log/secure yum -y install denyhosts service denyhosts start chkconfig denyhosts on |
Then DenyHosts will do its job. No need for maintenance.
You can view the blocked IP at:
| /etc/hosts.deny |
Activity log file is here:
| /var/log/secure |
The configuration of denyhosts is here:
| /etc/denyhosts.conf |
Saturday, May 31, 2008
MP3 Auto-Volume Level
I have found this useful software MP3Gain
It can adjust the volume level of MP3 files, without losing quality or embedded tag (artist, art work, lyric).
To use the MP3Gain:
1. Drag MP3 file(s) or folder, and drop into MP3Gain window.
2. Edit Target “Normal” Value to 97.0
(It equals to -12.5 dB in Sony SoundForge.)
3. Click on Track Analysis button. MP3Gain will calculate how much dB will be increased or decreased.
4. Click on Track Gain button to apply the calculated dB.
Finished…
The MP3Gain developer also builds AACGain too, which can adjust the volume level of AAC files.
It also available for Linux and Mac users.
It can adjust the volume level of MP3 files, without losing quality or embedded tag (artist, art work, lyric).
To use the MP3Gain:
1. Drag MP3 file(s) or folder, and drop into MP3Gain window.
2. Edit Target “Normal” Value to 97.0
(It equals to -12.5 dB in Sony SoundForge.)
3. Click on Track Analysis button. MP3Gain will calculate how much dB will be increased or decreased.
4. Click on Track Gain button to apply the calculated dB.
Finished…

The MP3Gain developer also builds AACGain too, which can adjust the volume level of AAC files.
It also available for Linux and Mac users.
Thursday, May 22, 2008
Tuesday, April 22, 2008
Sunday, March 23, 2008
Sunday, December 23, 2007
Windows XP Shutdown Timer
- Can't sleep? Wanna listen to music before sleep?
- Don't wanna wait for downloading file?
- Don't wanna wait for printer to finish printing?
- Don't wanna wait for copying files?
- Wanna limit computer using time of your kid?
Try this, shutdown timer.
Click Start -> Run
Then type
shutdown -s -f -t 3600
(3600 seconds = 60 minutes = 1 hour. Change it as you want.)
If you want to cancel the timer,
Click Start -> Run
Then type
shutdown -a
*** WARNING ***
All unsaved documents will be lost.
You MUST save them before starting the timer.
Subscribe to:
Posts (Atom)


